
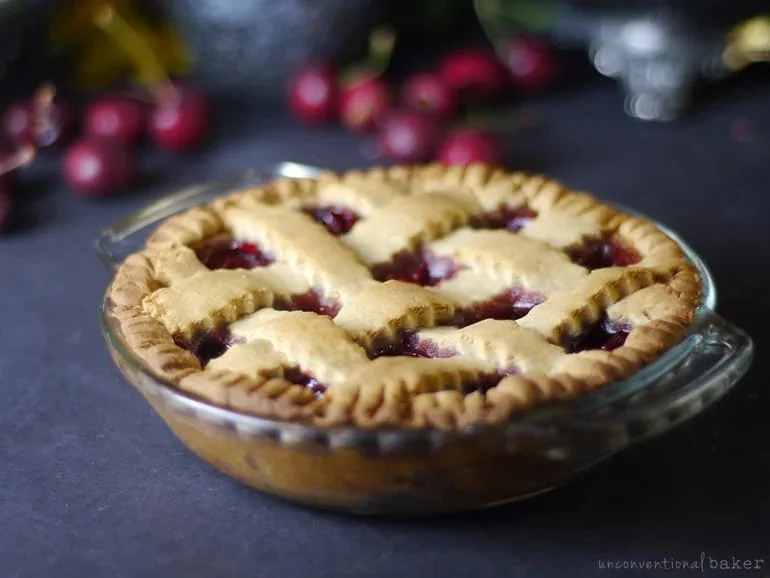
Cherry Pie (Vegan, Gluten-Free) is a delightful dish that captures the essence of nostalgia with every bite. This heavenly dessert is filled with juicy cherries, perfectly balanced sweetness, and an aromatic crust that crumbles just right. The comfort of a homemade Cherry Pie speaks to many, evoking memories of family gatherings and sunny afternoons. Best of all, this recipe is easy to follow with a step-by-step approach, making it perfect for bakers of all skill levels who want to indulge in a delicious, vegan, and gluten-free treat.
Ingredients
To create this scrumptious Cherry Pie, you’ll need the following ingredients:
- ¾ cup white rice flour: This flour offers a light and airy texture to your pie crust, providing a sturdy base without the gluten.
- ¼ cup cashew butter: Creamy and rich, cashew butter adds a nutty flavor while also binding the crust together.
- ¼ cup dark maple syrup: Infusing the pie with natural sweetness, dark maple syrup gives a warm, inviting finish.
- 1 tsp pure vanilla extract: An aromatic addition that enhances the overall flavor, making each bite even more delightful.
- ½ tsp almond extract: This adds a subtle nutty essence, complementing the cherries beautifully.
- ¾ cup chopped cherries: Fresh and juicy, the star of the show, bursting with flavor in every bite.
- 3 tbsp dark maple syrup: Used in the filling for an extra touch of sweetness, perfectly harmonizing with the tartness of the cherries.
- 1 tbsp tapioca starch: This acts as a thickening agent, ensuring the filling sets beautifully during baking.
- Juice of half a lemon: The citrusy zing brightens the cherry flavor and balances the sweetness.
- ½ tsp cinnamon: The warm spice elevates the dish, bringing a comforting aroma to your kitchen.
Step-by-Step Directions
-
Preheat your oven to 350°F (175°C). Begin by oiling a 6” pie plate (or a baking dish of a similar size) and set it aside.
-
Make the crust: In a food processor, combine all the crust ingredients and process them until they come together into a smooth dough. Gather the dough, form it into a ball, and knead it lightly. Divide this dough into two equal pieces, rolling each into a ball.
-
Shape the crust: Take one of the dough balls and flatten it into a disk using your hands. Press it firmly into the prepared pie plate, ensuring it covers the base and sides evenly. Set it aside.
-
Prepare the filling: In a small bowl, mix all the filling ingredients with a fork until well combined. This mixture will bring out the natural sweetness of the cherries and create a delightful thick consistency.
-
Assemble the pie: Pour the cherry filling into the prepared crust, smoothing it out into an even layer.
-
Create the lattice top: Take the remaining ball of dough, place it between two sheets of parchment paper, and roll it out to about ⅛” thickness. Cut the rolled dough into ½” strips lengthwise.
-
Build the lattice: Lay several strips vertically across the pie, then interlace with horizontal strips to create a beautiful lattice pattern. If you need additional strips, gather any remaining dough, roll it out again, and cut more.
-
Seal the edges: Fill in any gaps around the edges with remaining dough, and seal the edge of the pie all around using a fork for an attractive finish.
-
Bake: Place the pie in the oven and bake for approximately 45 minutes until the edges are golden and the filling bubbles and sets.
-
Cool and enjoy: Allow the pie to cool on a wire rack before serving. This lets the filling firm up, making for easy slicing and serving.
Tips & Tricks
- Use fresh cherries: While frozen cherries can work in a pinch, fresh cherries will provide the best flavor and texture.
- Adjust sweetness: Feel free to add more or less maple syrup to the filling based on your taste preference and the sweetness of your cherries.
- Experiment with spices: Adding a touch of nutmeg or cardamom can create a unique flavor profile in your pie.
Serving Suggestions & Pairings
Cherry Pie is delightful on its own, but it can be elevated with a few serving suggestions:
- Pair with vegan ice cream: A scoop of vegan vanilla or coconut ice cream right next to your pie creates a heavenly contrast of temperatures and textures.
- Serve with coconut whipped cream: For a dairy-free twist, try topping your pie with homemade coconut whipped cream for an extra creamy layer.
- Perfect for gatherings: This pie makes an ideal dessert for barbecues, potlucks, and holiday meals, delighting both vegans and non-vegans alike.
Nutritional Information
Each slice of this delectable Cherry Pie contains approximately 160 calories. The pie is naturally low in fat, thanks to the use of cashew butter instead of butter or shortening, and boasts a good amount of antioxidants from the cherries. Remember, moderation is key! Enjoy your pie with a balanced diet in mind.
Storing Tips & Variations
- Storing: Keep your pie in an airtight container at room temperature for up to 3 days or in the refrigerator for about a week.
- Freezing: If you want to save some for later, slice the pie and store pieces in the freezer in airtight containers for up to 2 months. Thaw in the fridge before serving.
- Variations:
- Try adding blueberries or raspberries alongside the cherries for a mixed berry pie.
- For a tropical twist, incorporate coconut flakes or mango into the filling.
Conclusion
Cherry Pie (Vegan, Gluten-Free) is a must-try recipe that combines comfort, flavor, and ease. Its beautiful appearance and scrumptious taste make it perfect for any occasion. You’ll love the delightful blend of textures and flavors from the luscious cherries and crispy crust. Don’t hesitate to bring this pie to your next gathering and share your baking experience with others!
FAQs
-
Can I use frozen cherries?
Yes, frozen cherries can be used, but be sure to thaw and drain excess moisture to prevent a soggy pie. -
Is this pie nut-free?
No, this version contains cashew butter. However, you can replace it with sunflower seed butter to make it nut-free. -
How do I know when the pie is done?
The pie is done when the edges are golden brown, and the cherry filling is bubbling. -
Can I make this pie ahead of time?
Absolutely! You can make the pie a day in advance and store it in the refrigerator until it’s time to serve. -
What if I don’t have tapioca starch?
If tapioca starch isn’t available, you can substitute it with cornstarch or arrowroot powder for similar thickening properties.
Cherry Pie
Ingredients
Method
- Preheat your oven to 350°F (175°C). Oil a 6” pie plate and set it aside.
- In a food processor, combine all the crust ingredients and process until smooth. Form the dough into a ball, divide into two equal pieces, rolling each into a ball.
- Flatten one dough ball into a disk and press it into the prepared pie plate, covering the base and sides evenly. Set aside.
- Mix all filling ingredients in a small bowl until well combined.
- Pour the cherry filling into the prepared crust and smooth it out.
- Roll out the remaining ball of dough and cut into ½” strips. Lay several strips vertically across the pie and interlace with horizontal strips to create a lattice pattern.
- Seal the edges with remaining dough, using a fork for an attractive finish.
- Bake the pie for approximately 45 minutes until the edges are golden and the filling bubbles.
- Allow the pie to cool on a wire rack before serving.

Leave a Reply