
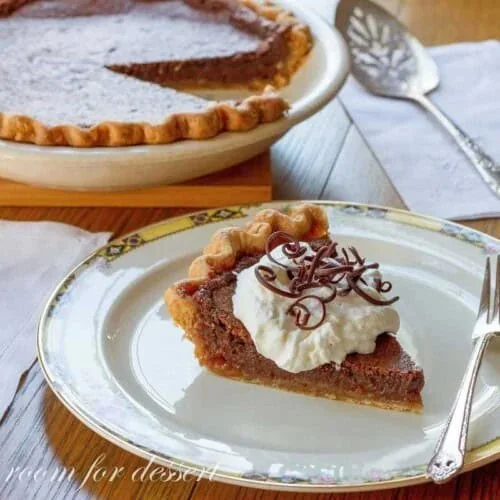
Minny’s Chocolate Pie is a delightful dessert that captures the essence of comfort and indulgence in every slice. With its rich, creamy filling and perfectly baked crust, this pie has become a cherished recipe, often evoking fond memories of family gatherings and celebrations. It’s not just a treat; it’s a testament to the joy of sharing delicious moments with loved ones. This step-by-step recipe ensures that even novice bakers can create this captivating dessert that promises to impress friends and family alike.
Ingredients
To make Minny’s Chocolate Pie, you will need the following ingredients:
For the Perfect Pie Crust (see notes for link)
- 1 recipe for Perfect Pie Crust
For the Filling
- 1 ½ cups granulated sugar – Sweetness that blends harmoniously into the filling.
- 3 tablespoons unsweetened cocoa powder – Adds a rich chocolate flavor with a deep, dark hue.
- 4 tablespoons unsalted butter, melted – Provides a luscious, buttery richness.
- 2 large eggs, beaten – The binding agent that adds structure to the filling.
- ¾ cup evaporated milk – Ensures a creamy, silky texture.
- 1 teaspoon pure vanilla extract – Introduces an aromatic sweetness.
- ¼ teaspoon salt – Balances the flavors beautifully.
For Serving
- Whipped cream – Optional, but this light, fluffy topping adds a nice contrast to the rich pie.
Step-by-Step Directions
-
Preheat Oven: Start by preheating your oven to 350°F (175°C). A properly heated oven ensures an evenly cooked pie.
-
Prepare Pie Crust: Place the prepared pie dough on a lightly floured work surface. Roll it out to fit your pie pan comfortably. Crimp the edges for a beautiful finish and use a fork to prick the dough, preventing it from puffing up during baking. Once prepared, refrigerate the crust for 30 minutes, allowing it to firm up.
-
Blind Bake the Crust: Line the pie crust with foil or parchment paper. Add dried beans or pie weights to hold the shape and bake for 15 minutes. After this initial baking, carefully remove the foil and beans and bake for an additional 5 minutes. Your goal is to have a crust that is dry but not browned.
-
Prepare the Filling: While the crust is baking, whisk together the granulated sugar, cocoa powder, melted butter, beaten eggs, evaporated milk, vanilla extract, and salt in a large mixing bowl. Mix until the ingredients combine into a smooth and glossy filling.
-
Combine and Bake: Pour the luscious filling into the pre-baked pie shell. Bake for 45 minutes, or until the edges are set while the center retains a slight jiggle. To prevent the crust from over-browning, cover the crust with strips of foil halfway through baking.
-
Cool and Serve: Once baked, remove the pie from the oven and let it cool on a rack. This cooling stage is essential for achieving the perfect texture. When ready to serve, top each slice with whipped cream for an extra indulgent experience.
-
Store Leftovers: Wrap any leftovers in plastic wrap or store in an airtight container in the refrigerator for up to three days.
Tips & Tricks
- For a flaky crust, avoid overworking the dough. Just mix until combined!
- Use high-quality cocoa powder for a deeper chocolate flavor.
- Let the pie cool completely before slicing for cleaner cuts.
- If you like a thicker filling, you can reduce the amount of evaporated milk slightly.
Serving Suggestions & Pairings
Minny’s Chocolate Pie pairs beautifully with a scoop of vanilla ice cream or a dollop of freshly whipped cream. It’s great for special occasions like birthdays, family gatherings, or holiday dinners. Serve alongside a fresh fruit salad to balance the richness of the chocolate.
Nutritional Information
A slice of Minny’s Chocolate Pie contains approximately:
- Calories: 350
- Fat: 18g
- Carbohydrates: 45g
- Protein: 4g
While this treat is indulgent, moderation is key. Enjoy it as a sweet dessert but be mindful of portion sizes.
Storing Tips & Variations
Store any leftovers in the refrigerator for up to three days. Minny’s Chocolate Pie can also be frozen for up to one month; wrap it tightly with plastic wrap and aluminum foil to prevent freezer burn. To enjoy, simply thaw in the refrigerator overnight.
For variations, consider adding a layer of chocolate ganache on top before serving or incorporate some crushed nuts into the filling for added texture.
Conclusion
Minny’s Chocolate Pie is a simple yet satisfying dessert that will delight chocolate lovers and create lasting memories. Whether you’re baking for a special occasion or just because, this rich and creamy pie is sure to please. Try it today, and don’t forget to share your experience!
FAQs
-
Can I substitute ingredients?
- Yes! You can use coconut milk or almond milk as a substitute for evaporated milk for a dairy-free option.
-
How can I tell when the pie is done?
- The filling should be set around the edges but still have a slight jiggle in the center. It will firm up as it cools.
-
Is there a gluten-free option for the crust?
- Absolutely! You can use a gluten-free pre-made crust or make your own using gluten-free flour.
-
Can I make this pie ahead of time?
- Yes, you can bake the pie a day in advance. Just make sure to store it in the refrigerator until you’re ready to serve.
-
What other toppings can I use?
- Besides whipped cream, consider toppings like a drizzle of caramel sauce, fresh berries, or chocolate shavings for added flair.
Minny’s Chocolate Pie
Ingredients
Method
- Preheat your oven to 350°F (175°C). A properly heated oven ensures an evenly cooked pie.
- Place the prepared pie dough on a lightly floured work surface. Roll it out to fit your pie pan comfortably. Crimp the edges for a beautiful finish and use a fork to prick the dough, preventing it from puffing up during baking. Once prepared, refrigerate the crust for 30 minutes.
- Line the pie crust with foil or parchment paper. Add dried beans or pie weights to hold the shape and bake for 15 minutes.
- After this initial baking, carefully remove the foil and beans and bake for an additional 5 minutes.
- While the crust is baking, whisk together the granulated sugar, cocoa powder, melted butter, beaten eggs, evaporated milk, vanilla extract, and salt in a large mixing bowl. Mix until the ingredients combine into a smooth and glossy filling.
- Pour the luscious filling into the pre-baked pie shell.
- Bake for 45 minutes, or until the edges are set while the center retains a slight jiggle. Cover the crust with strips of foil halfway through baking to prevent over-browning.
- Once baked, remove the pie from the oven and let it cool on a rack. This cooling stage is essential for achieving the perfect texture.
- When ready to serve, top each slice with whipped cream for an extra indulgent experience.
- Wrap any leftovers in plastic wrap or store in an airtight container in the refrigerator for up to three days.

Leave a Reply