
Homemade Peach Jam is a delightful treat that embodies the essence of summer with its sweet, juicy flavor and vibrant golden hue. The process of making this jam is rewarding and brings a sense of nostalgia, reminding us of lazy afternoons spent in sunny kitchens. This easy, step-by-step recipe is perfect for those who want to bring a taste of home into their kitchen while creating something comforting and delicious. Whether you’re spreading it on your morning toast or using it in dessert, Homemade Peach Jam is definitely worth trying!
Ingredients
- 1 kg – 2.2 lbs of peaches, peeled and cored
- 400 g – 14 oz sugar
- Juice of 1 lemon
The star ingredient here is the peaches. They are creamy and juicy, bursting with sweetness that is simply irresistible. Paired with the granulated sugar, which adds a touch of sweetness and helps in preserving the jam, the combination creates a lusciously smooth spread. The lemon juice brightens the flavor and helps the jam to set, providing a perfect balance to the rich, aromatic fruit.
Step-by-Step Directions
-
Begin by chopping the cleaned peaches into small pieces and placing them in a large pot. Their distinct aroma fills the air, setting a warm and inviting atmosphere in your kitchen.
-
Next, add the sugar and lemon juice to the pot. Mix the ingredients well, ensuring that the sugar begins to dissolve into the juicy peaches. It’s a simple yet satisfying process that blends scents and textures beautifully.
-
Turn on the heat to a moderate-high setting and cook the mixture while stirring often to prevent the jam from sticking to the bottom of the pan. This step usually takes around 20 to 30 minutes. As it cooks, you may notice foam forming on the surface – use a slotted spoon to remove this for a clearer jam.
-
While your jam is coming together, place a small plate in the freezer. This will be used later to test for doneness, ensuring your jam achieves the perfect consistency.
-
After about 20 minutes, keep an eye on the jam’s texture, as it should start to gel. Once it appears thickened, turn off the heat.
-
Now comes the crucial testing phase: take a small amount of jam and place it on the frozen plate, returning it to the freezer for a few minutes. If the jam wrinkles when nudged, it’s ready! If it remains runny, continue cooking and testing until it reaches your desired consistency.
-
Finally, pour the jam into sterilised jars while it’s still hot. Be sure to seal them tightly to maintain freshness.
Tips & Tricks
- Use ripe peaches for the best flavor and texture. Overripe peaches will yield a sweeter and smoother jam.
- Don’t skip the bowl in the freezer; it is a key step in determining the right consistency.
- Experiment with adding spices like cinnamon or vanilla for a unique flavor twist.
Serving Suggestions & Pairings
Homemade Peach Jam is versatile and pairs beautifully with various foods. Spread it on warm toast or croissants for breakfast or use it as a filling for pastries. It also makes an excellent topping for yogurt or ice cream, elevating your dessert game. For gatherings, consider serving it with a cheese platter, pairing the sweet jam with tangy cheeses for a palate-pleasing contrast.
Nutritional Information
A typical serving of Homemade Peach Jam (about 1 tablespoon) contains approximately 50 calories, mainly from sugar. It’s best enjoyed in moderation, especially since homemade jams retain the natural fruit flavors without unnecessary preservatives. Balance your diet by incorporating fresh fruits and vegetables alongside your delicious peach jam.
Storing Tips & Variations
To store your Homemade Peach Jam, keep it in a cool, dark place. Unopened jars can last up to a year, while opened jars should be refrigerated and consumed within a few weeks. If you want to preserve it for longer, consider freezing the jam in airtight containers. You can also experiment with different fruits, such as combining peaches with berries or apples for delightful variations.
Conclusion
Now that you have the recipe for Homemade Peach Jam, it’s time to try it out! The process of making your own jam is not just about creating a delicious spread; it’s about making memories and enjoying the fruits of your labor. Share your experience with friends and family, and let the sunshine of summer grace your kitchen year-round.
FAQs
-
Can I use frozen peaches instead of fresh ones?
Yes, frozen peaches can work well too, but make sure to thaw and drain any excess liquid before cooking. -
How do I know when my jam is ready?
The wrinkle test on a frozen plate is the easiest way. If it wrinkles when nudged, it’s perfect! -
Is it necessary to use lemon juice?
Yes, lemon juice is vital because it helps with the gelling process and balances the sweetness. -
Why is my jam runny?
This could be due to undercooking it. Consider cooking it longer and retesting it for the right consistency. -
Can I reduce the sugar in the recipe?
While you can reduce the sugar, it may affect the flavor and preservation of the jam. If you want to use less sugar, consider adding pectin to help it set.
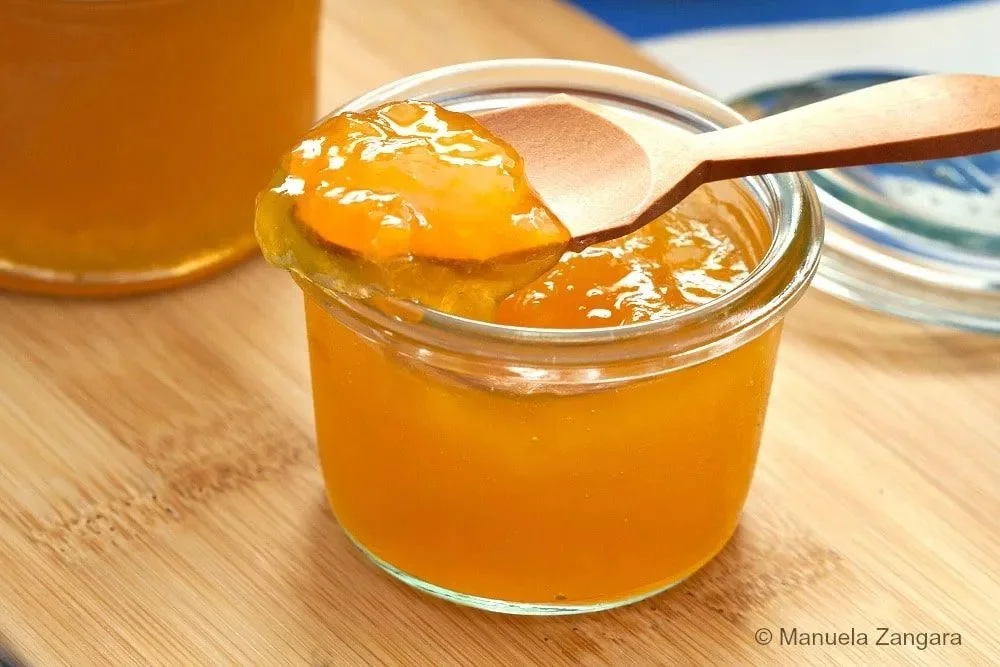
Homemade Peach Jam
Ingredients
Method
- Chop the cleaned peaches into small pieces and place them in a large pot.
- Add the sugar and lemon juice to the pot, mixing well to dissolve the sugar into the peaches.
- Turn on the heat to moderate-high, and cook the mixture while stirring often to prevent it from sticking.
- Cook for about 20 to 30 minutes, removing foam from the surface with a slotted spoon.
- Place a small plate in the freezer to test for doneness later.
- Check the jam’s texture after 20 minutes; if it appears thickened, turn off the heat.
- Take a small amount of jam and place it on the frozen plate. If it wrinkles when nudged, it’s ready.
- Pour the jam into sterilized jars while still hot, sealing them tightly.

Leave a Reply