
Extra Flaky Gluten Free Pie Crust Recipe is a delightful indulgence that transcends the typical gluten-free alternative. This pie crust is renowned for its light, flaky texture that offers a satisfying crunch with every bite, while the buttery richness ensures that it’s nothing short of comforting. Whether you’re preparing a classic apple pie or an elegant quiche, this recipe is incredibly easy to follow in a step-by-step manner, making it accessible for bakers of all levels. The promise of warm, freshly baked pastries filling your home with a tantalizing aroma makes this recipe worth your time and effort.
Ingredients
To craft this extra flaky gluten-free pie crust, gather the following ingredients:
- 1 1/2 cups all-purpose gluten-free flour blend – A mix that brings the right texture, providing a balance between tenderness and stability.
- 3/4 teaspoon xanthan gum (omit if your blend already contains it) – This acts as a binding agent, giving the crust a stable structure without gluten.
- 1/4 teaspoon baking powder – Adds a touch of leavening that creates a desirable lightness.
- 1/2 teaspoon kosher salt – Enhances the overall flavor of the crust and balances its sweetness.
- 6 tablespoons unsalted butter (roughly chopped and chilled) – Provides a rich, creamy flavor that complements the flour blend perfectly.
- 1/2 cup sour cream (full fat, preferably, chilled) – This ingredient adds moisture and tang, ensuring a delightful taste and texture.
- Ice water by the teaspoonful (as necessary) – A crucial component to bring the dough together without making it too wet.
- Egg white (for brushing, optional) – Gives the crust a beautiful, golden finish when baked.
By using these wholesome ingredients, you’ll create a pie crust that evokes nostalgia, inviting you back to family gatherings filled with warmth and love.
Step-by-Step Directions
Step 1: Prepare the Dry Ingredients
In a large mixing bowl, combine the gluten-free flour blend, xanthan gum, baking powder, and kosher salt. Whisk them together until they’re well-combined, ensuring that your crust will have a consistent texture without any clumps.
Step 2: Incorporate the Butter
Add the chilled, chopped butter to the dry mixture. Toss the butter in the flour until it’s completely coated. Using your fingers, flatten each chunk of butter between your thumbs and forefingers, creating flat shards coated in flour. This technique is key for achieving that extra flaky texture.
Step 3: Mix in the Sour Cream
Next, create a well in the center of your dry ingredients where the butter shards reside. Pour in the sour cream and mix it gently into the dry ingredients, aiming to moisten everything. Think of this as a loving embrace for your flour mix. The dough should appear shaggy and a bit crumbly.
Step 4: Moisten the Dough
If you notice some dry patches in the dough, isolate them and drizzle a teaspoon of ice water onto those areas. Mix slightly and continue adding water as needed, until everything is just moistened. Use your clean hands to knead the dough lightly until it begins to come together.
Step 5: Chill the Dough
Turn the dough out on a sheet of plastic wrap, pressing it gently into a disk shape. Wrap it snugly and refrigerate for about 30 minutes. This chilling process helps solidify the butter, leading to a flakier crust when baked.
Step 6: Roll Out the Dough
Once chilled, remove the dough from the refrigerator. On a lightly floured surface, sprinkle a tiny bit of flour on the top of the dough. Roll it out into a rough rectangle approximately 1 inch thick. Be gentle and frequently move the dough to prevent sticking. Fold the rectangle into thirds, like a business letter, sprinkling more flour if needed.
Step 7: Repeat the Folding Process
Roll out the dough again into a rough rectangle about 1 inch thick and fold it into thirds a second time. Repeat this process one last time, rolling the dough out, folding it, and finally shaping it into a square packet. This folding method is essential for incorporating layers of butter, which will elevate the flakiness.
Step 8: Final Chill and Shape
If the dough feels warm or butter is melting, cover it and chill it further until firm. Roll out the dough into an 11-inch round, about 3/8-inch thick, ensuring a good round shape. If there are any splits, gently pinch them together to seal.
Step 9: Transfer to Pie Plate
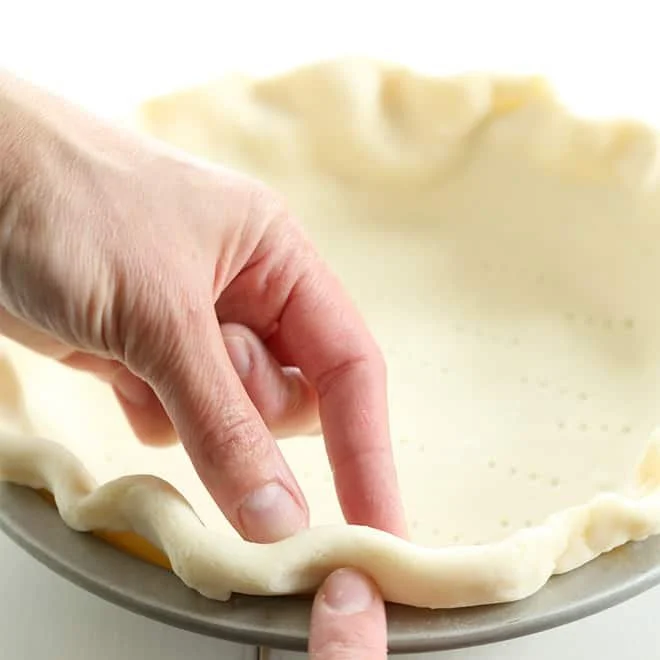
Carefully roll the pie crust onto a rolling pin and unroll it over a greased 9-inch metal pie plate. Trim any overly rough edges with kitchen shears or a sharp knife, then lift the crust gently to allow slack. Tuck the excess under itself at the perimeter and crimp the edges to create a decorative finish.
Step 10: Chill Before Baking
Cover the pie crust with plastic wrap and let it chill in the refrigerator for at least 30 minutes, allowing it to firm up. This chilling step is crucial for maintaining the shape during baking.
Step 11: Preheat and Prepare for Baking
Preheat your oven to 375°F. Once ready, remove the crust from the refrigerator, unwrap it, and use a fork to pierce the bottom all over. This prevents the crust from puffing during baking.
Step 12: Bake the Crust
Lay a sheet of parchment paper over the crust and fill it with pie weights or dried beans. Place the plate in the center of the preheated oven and bake for about 10 minutes. The crust should start to gain a slight golden hue on the edges but remain mostly pale.
Step 13: Finish Baking
Remove the parchment and weights. If the bottom of the crust still looks shiny, brush it with egg white and return to the oven for another 2-4 minutes, until lightly golden. Allow the crust to cool completely before filling as desired.
Tips & Tricks
For an even flakier crust, ensure all of your ingredients are well chilled. Cold butter is key, as it helps create those lovely flaky layers. Also, when rolling out the dough, don’t overwork it; mix just enough to bring it together. If you find it hard to handle, flip it once or twice on a floured surface to maintain its integrity.
Serving Suggestions & Pairings
This gluten-free pie crust is perfect for all kinds of fillings, from savory quiches with vegetables and cheese to sweet pies filled with fruit or custard. It pairs beautifully with whipped cream, ice cream, or a dollop of yogurt, making it a versatile choice for desserts and meals alike.
Nutritional Information
Per slice (based on 8 slices), this crust contains approximately:
- Calories: 180
- Total Fat: 12g
- Saturated Fat: 7g
- Carbohydrates: 15g
- Protein: 3g
This pie crust offers a satisfying treat while being mindful of a balanced diet, especially for those needing gluten-free options.
Storing Tips & Variations
You can store the unbaked pie crust in the refrigerator for up to 3 days, wrapped tightly in plastic. For longer storage, consider freezing it before it’s baked. Wrap it well and store it in the freezer for up to a month. When you’re ready to use it, thaw it in the refrigerator overnight. Feel free to experiment with flavors by adding herbs or spices into the dough for unique savory pies.
Conclusion
Embrace the joy of baking and try out the Extra Flaky Gluten Free Pie Crust Recipe for your next baking adventure. With its delightful texture and buttery flavor, it’s bound to become a household favorite. Don’t forget to share your experience and variations with friends and family to inspire others to create their own delicious gluten-free masterpieces!
FAQs
1. Can I use a different type of flour?
While this recipe is specifically designed for gluten-free flour blends, you can experiment with other gluten-free options. Be mindful that different flours may alter the texture and flavor.
2. How do I know when the crust is done baking?
The crust should start to turn a light golden brown. If you see any slick shiny areas, it likely needs a few more minutes in the oven.
3. Can I make this crust vegan?
Yes, you can substitute the butter with a vegan alternative and the sour cream with a non-dairy sour cream or yogurt. Just ensure your gluten-free flour blend is vegan-friendly.
4. How can I help the crust stay in shape while baking?
Using pie weights or dried beans during the initial baking phase helps prevent it from puffing and falling. Always pierce the bottom with a fork to reduce steam buildup.
5. What types of pies work best with this crust?
This crust is versatile and works beautifully for both sweet and savory pies, like apple pie, quiche, or even a rich chocolate tart, making it a fantastic base for your culinary creativity!
Extra Flaky Gluten Free Pie Crust
Ingredients
Method
- In a large mixing bowl, combine the gluten-free flour blend, xanthan gum, baking powder, and kosher salt. Whisk until well-combined.
- Add the chilled, chopped butter to the dry mixture. Toss and coat the butter with flour, then flatten each chunk of butter with your fingers.
- Create a well in the center and add the sour cream. Mix gently until moistened; the dough should appear shaggy.
- Isolate dry patches, drizzle with ice water, and knead lightly until the dough comes together.
- Press the dough into a disk shape, wrap in plastic wrap, and refrigerate for 30 minutes.
- On a floured surface, roll the chilled dough into a rectangle about 1 inch thick, then fold into thirds like a letter.
- Repeat the rolling and folding process two more times to create layers.
- If dough feels warm, chill until firm. Roll out to an 11-inch round, 3/8-inch thick, pinching any splits.
- Transfer to a greased 9-inch metal pie plate and crimp the edges.
- Cover with plastic wrap and chill in the refrigerator for at least 30 minutes.
- Preheat your oven to 375°F. Pierce the bottom with a fork, cover with parchment paper, and fill with pie weights.
- Bake for about 10 minutes until edges are slightly golden.
- Remove the weights and brush the bottom with egg white if shiny. Bake for another 2-4 minutes until lightly golden.
- Allow the crust to cool completely before filling.

Leave a Reply